Reconciling GAZ1’s Karameikos with X1, Expert Set & B10 Karameikos (1987)
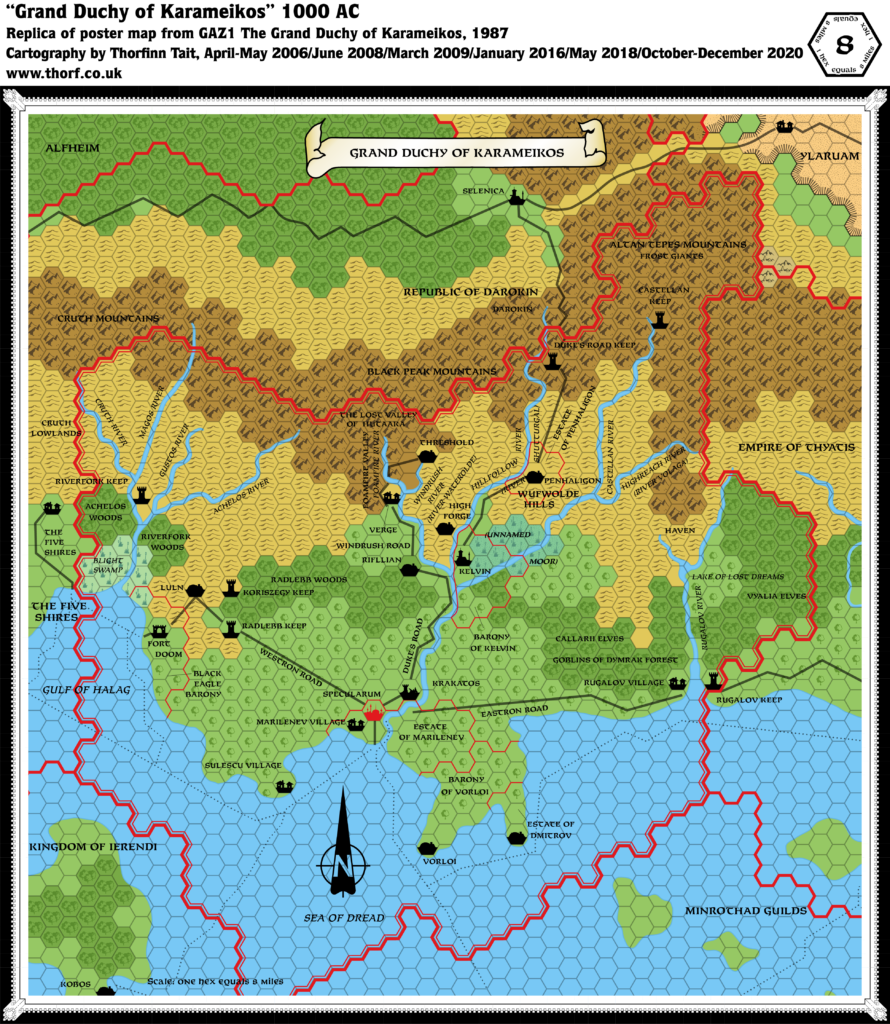
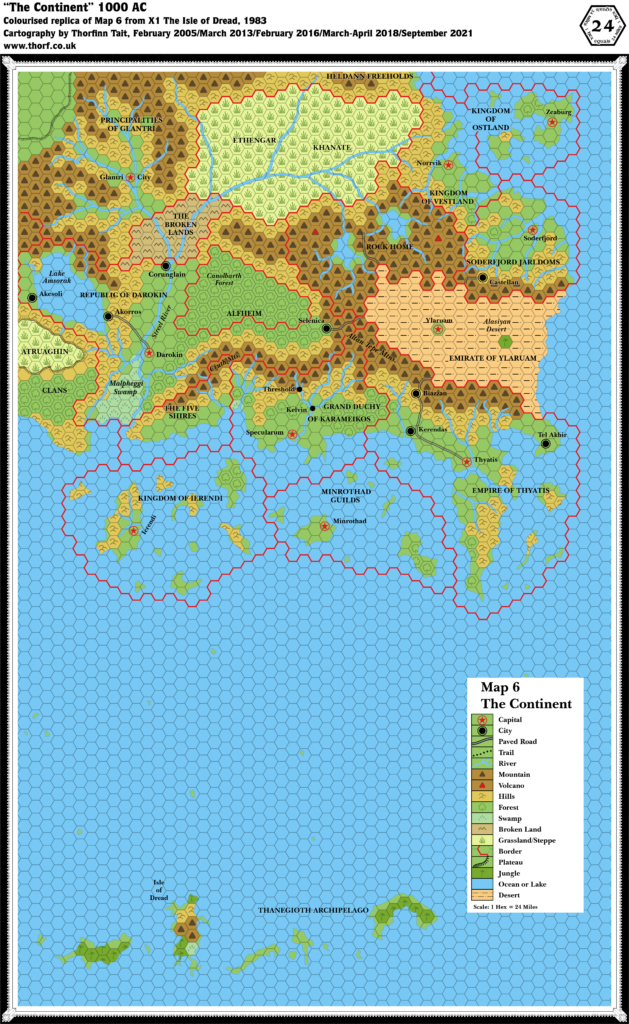
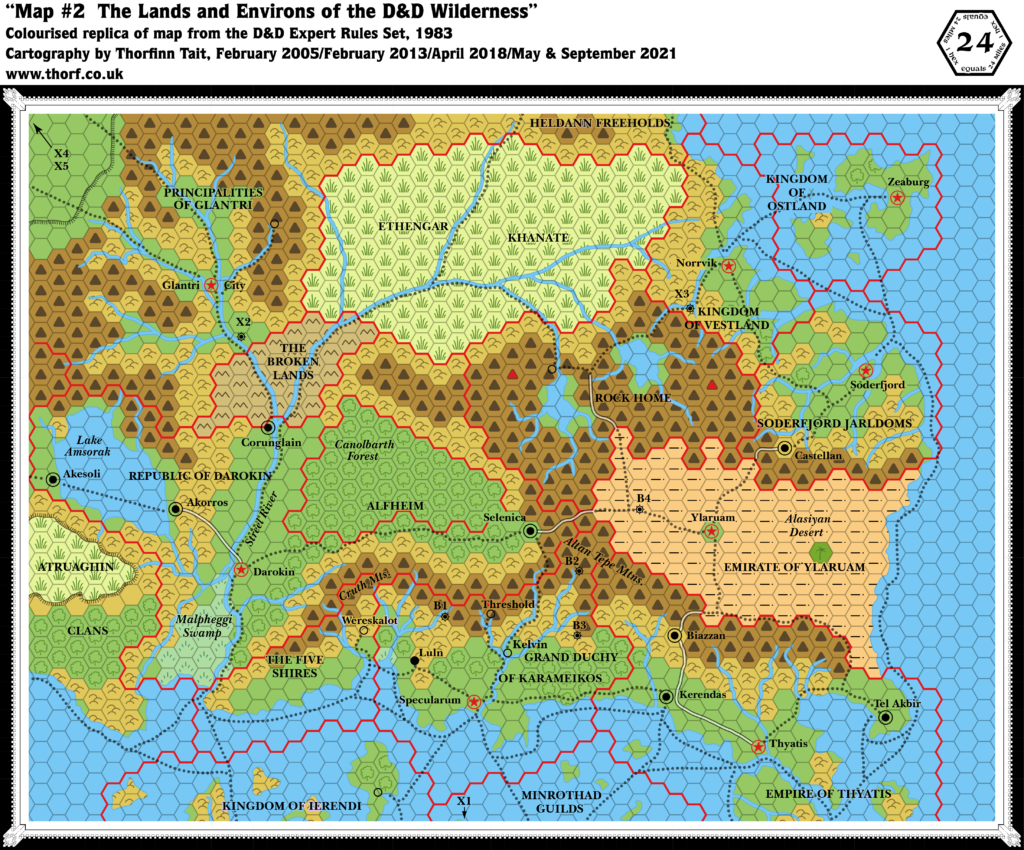
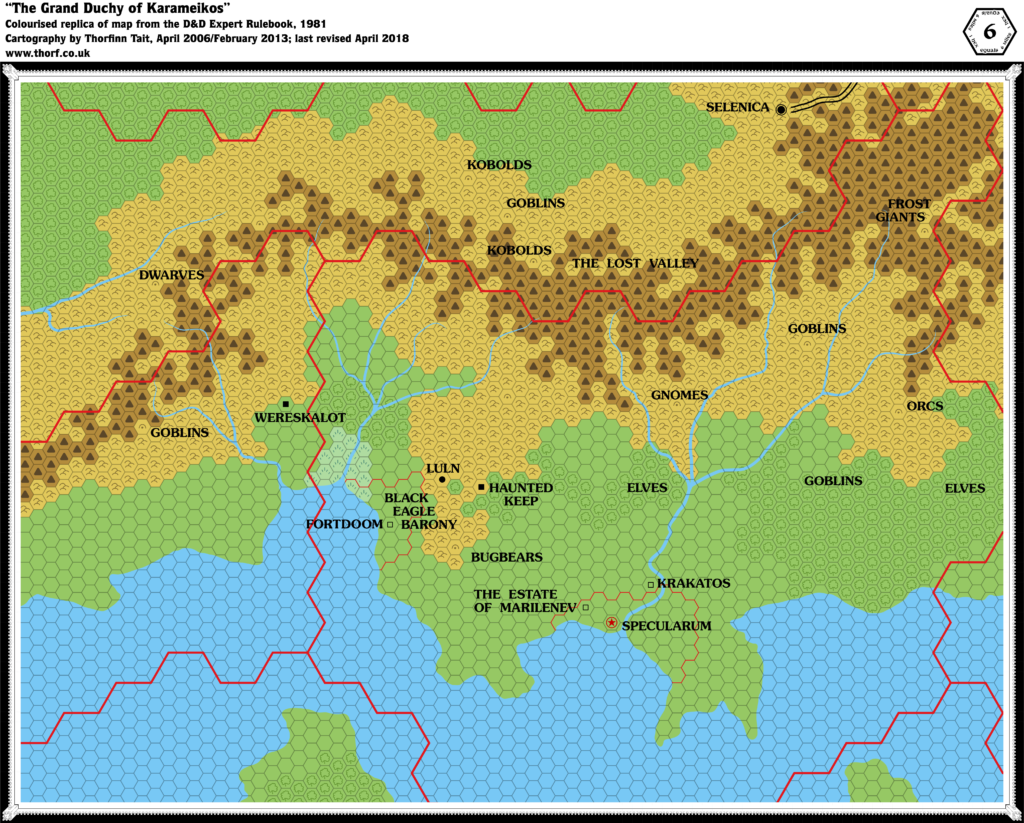
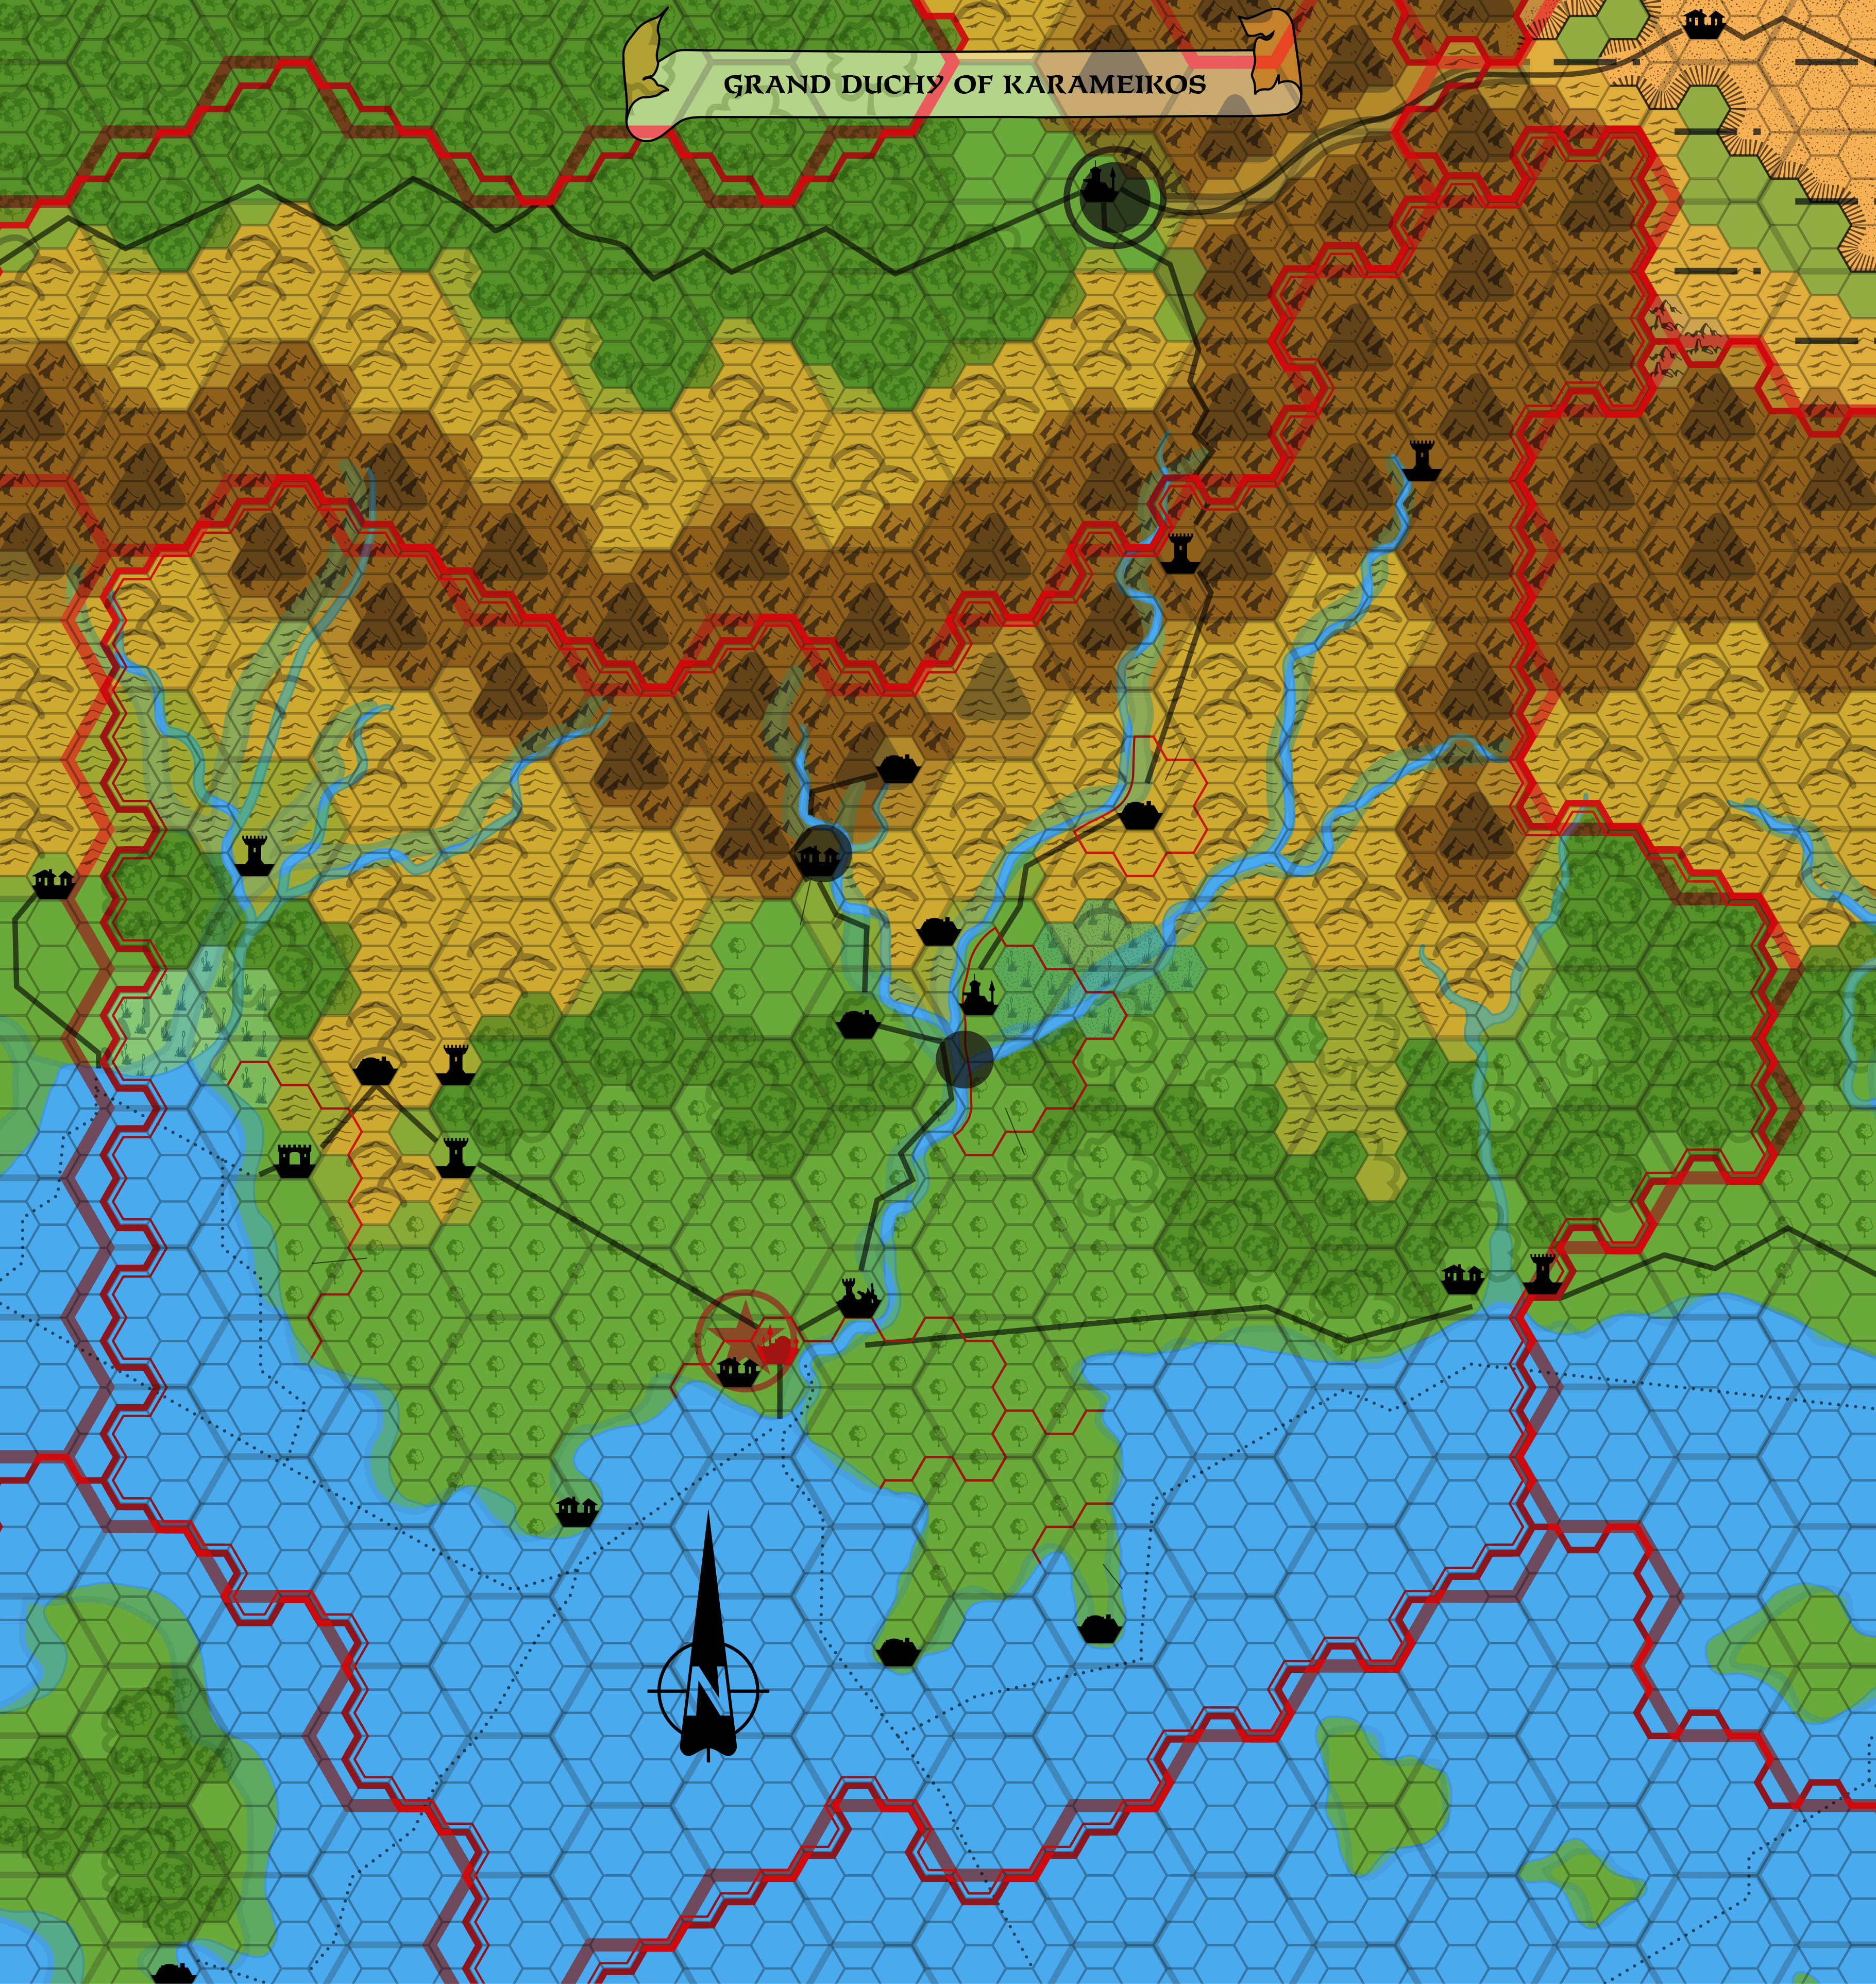
The Maps in Question

The Problem
Karameikos saw slow but steady development over the first years of Mystara’s publication. This was divided into three main stages: X1 and the Expert Set, both 1981 and 1983 versions; B10; and finally GAZ1. Taken in isolation, each of these versions is a perfectly valid view of Karameikos in its own right. However, problems arise when trying to use them together.
The specific conflicts arising in B10, and the issues involved with reconciling them with X1/Expert/X10 maps, are the subject of two other articles in this series, The Woes of B10 (upcoming) and The Never-ending Story (also upcoming). This article concentrates on the problems that arise afterwards, when GAZ1 enters the picture.
Overview
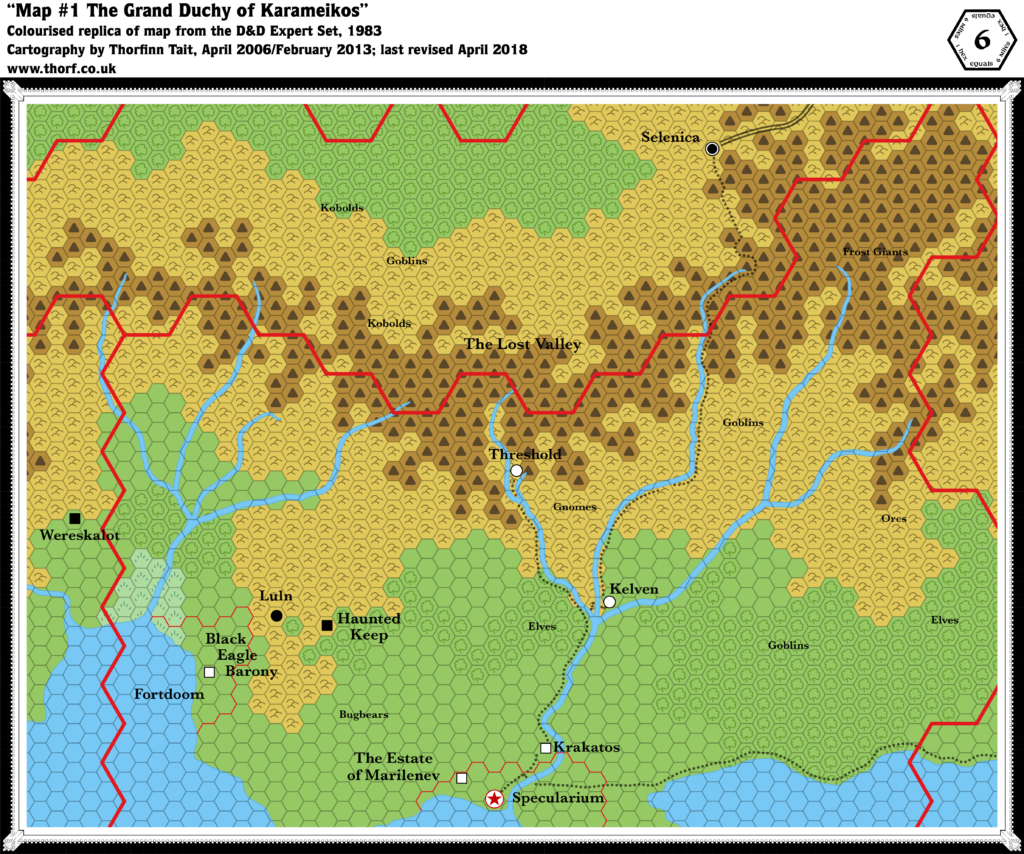
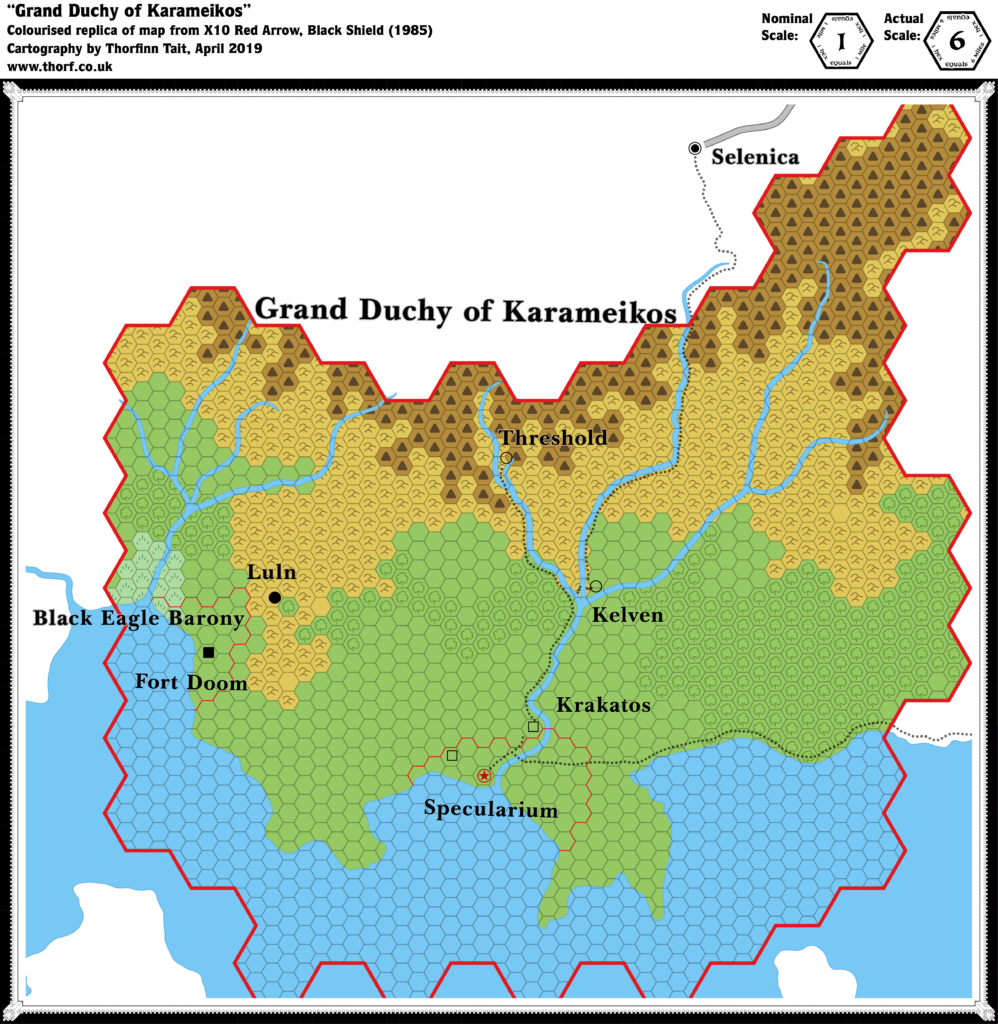
Overall, the situation with GAZ1’s map is a complete mess. The existence of multiple larger scale maps in previous products — 6 mile per hex in Expert 1981 & 1983, then again in X10; 3 and 2 mile per hex in B10 — was not taken into account. Instead, the map was reconverted seemingly from scratch from the original 24 mile per hex map from X1, adding new terrain details appropriate to the scale. GAZ1’s designers were either unaware of previous maps, or did not have access to them — at least not until late in the process. As a result, the 8 mile per hex map has a great many conflicts with the 6 mile per hex maps.
How to reconcile these conflicts is a major question that has stymied my attempts multiple times over the years, making me throw up my hands in frustration, and causing me to walk away over and over again.
Lining Up GAZ1 with the 24 mile per hex maps
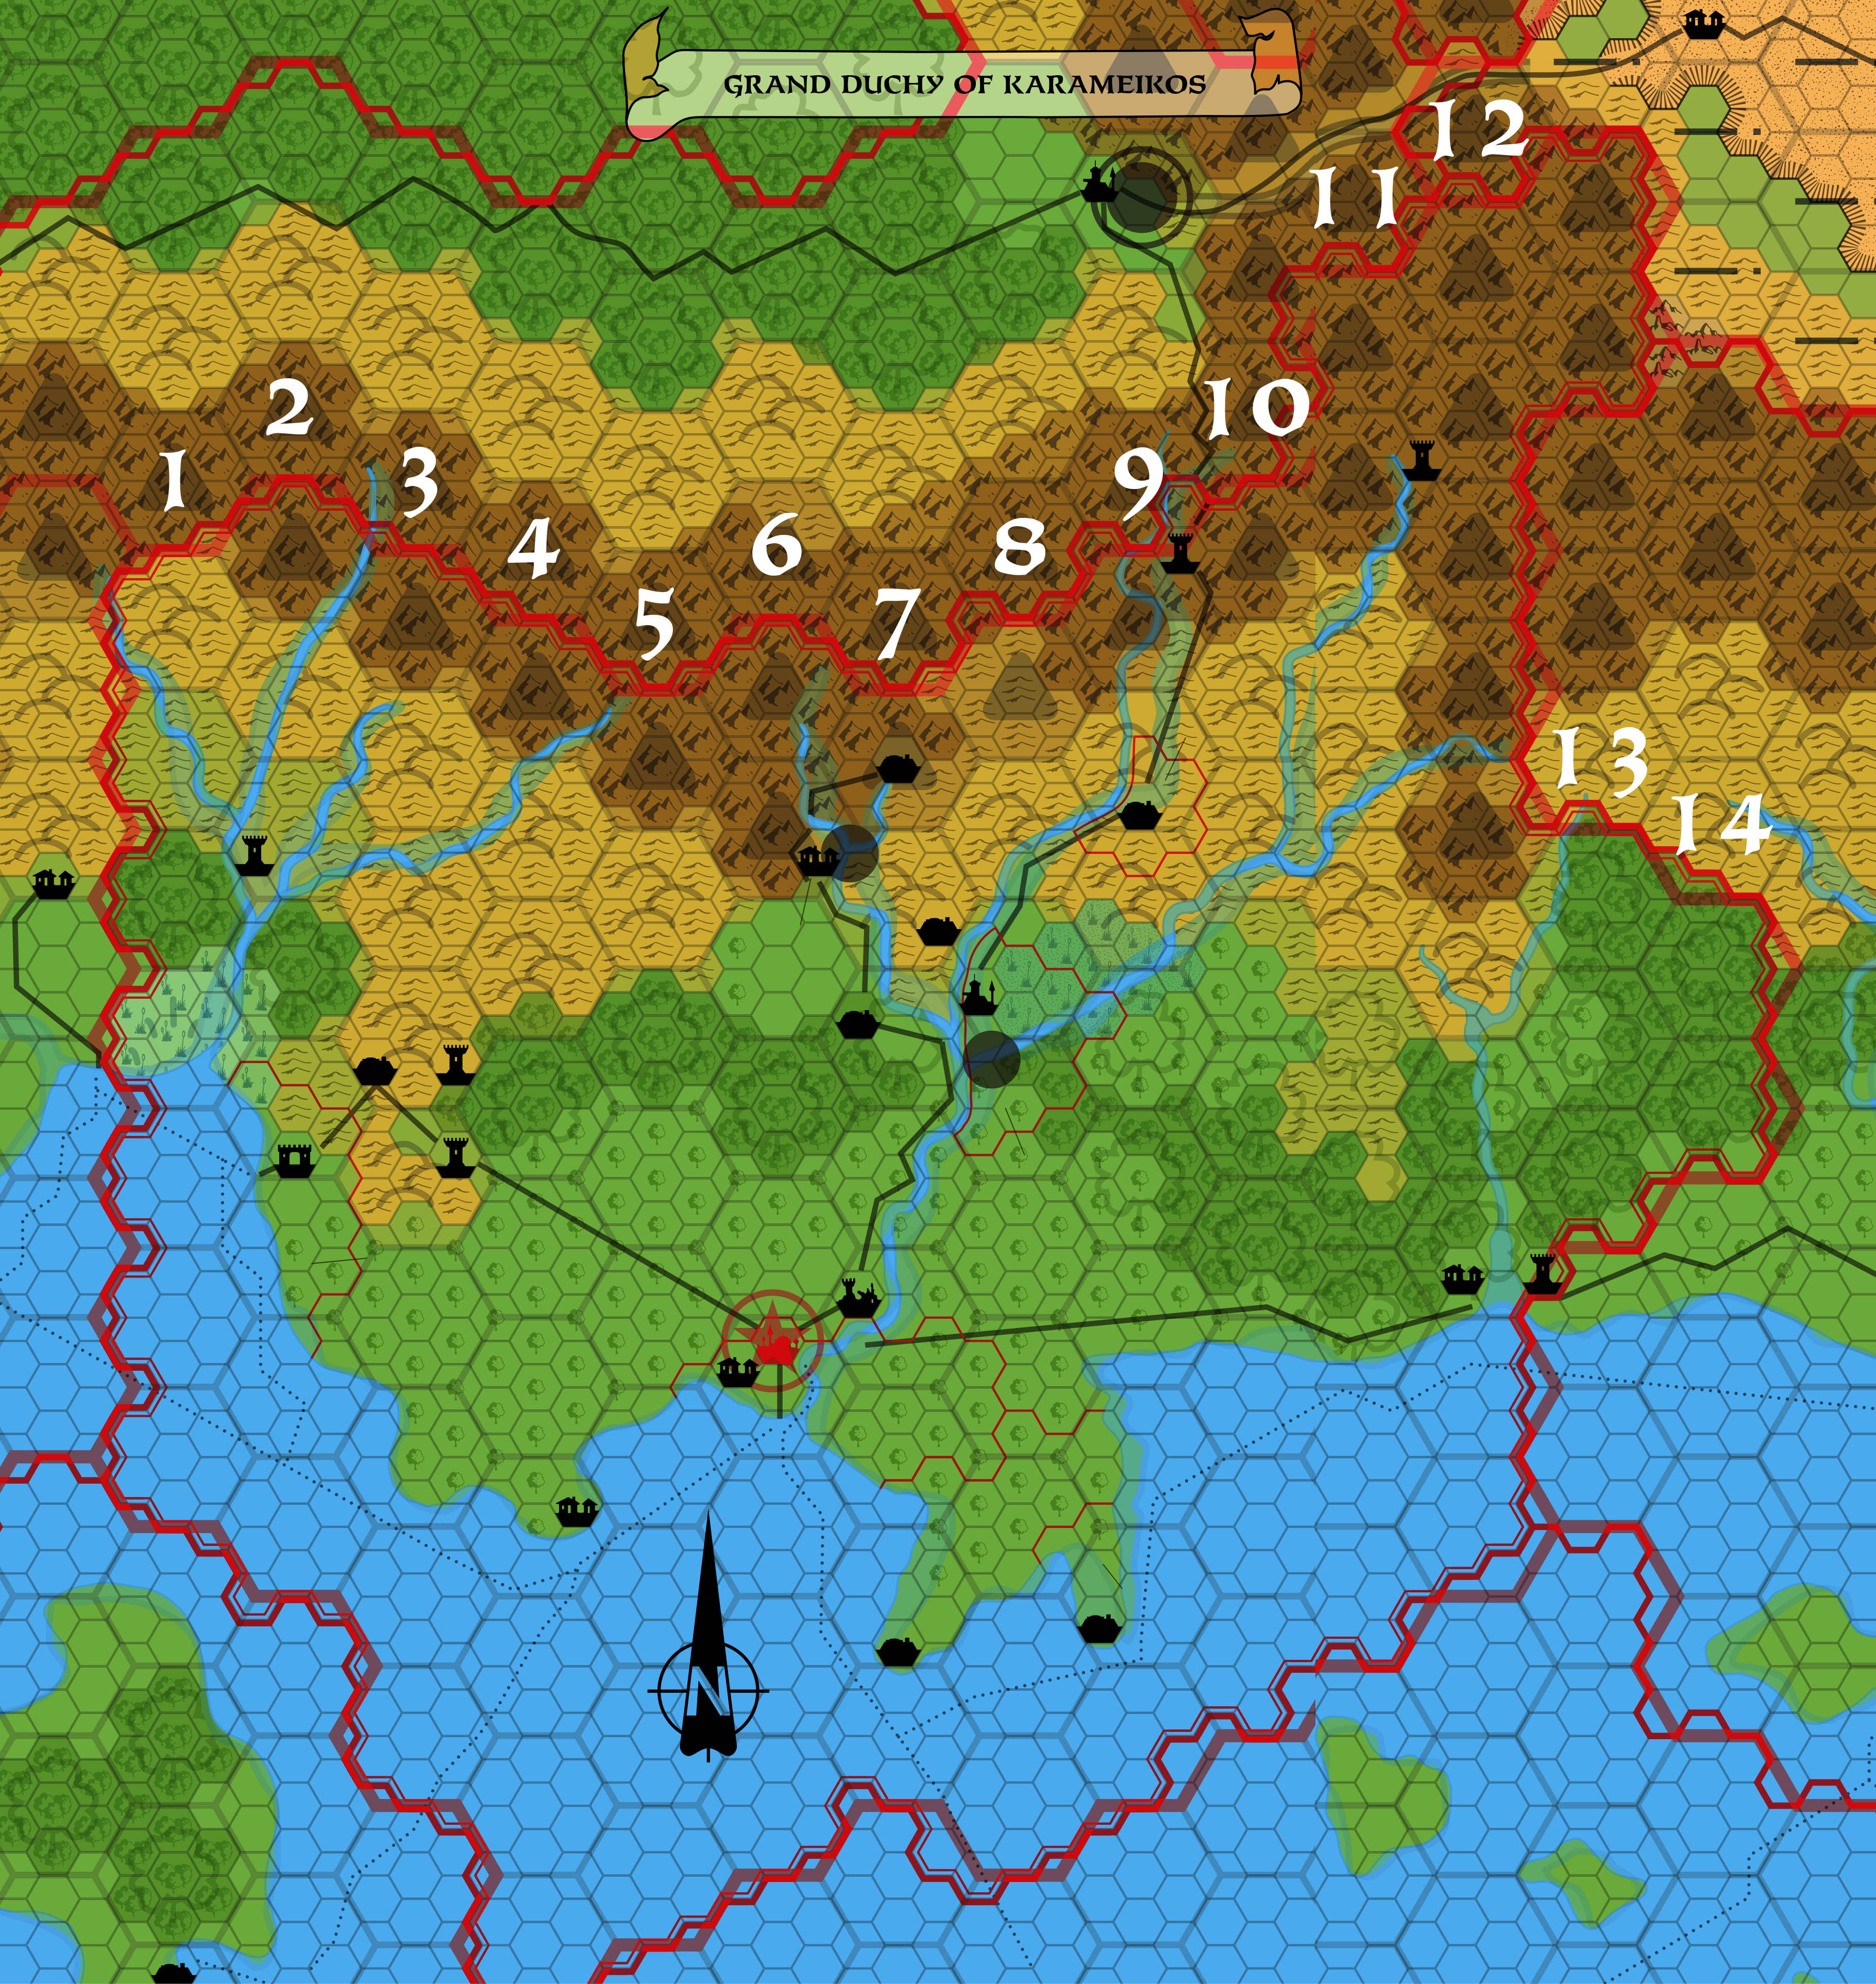
Although GAZ1 went back to X1 as a base for its map, the fit with the 24 mile per hex map was itself problematic. The western two thirds of Karameikos’ territory are a close fit, but the eastern third (five columns of hexes) is clearly out of sync — as if the overlay slipped during production. This can clearly be seen by overlaying the 24 mile per hex map’s national border on the 8 mile per hex map.

Observe how the border fits the western two thirds in the left-hand overlay, but is out of sync for the eastern third. Conversely, with X1 moved to match the eastern border as in the right-hand overlay, now only the eastern third of the nation is in sync.
Although this issue is undoubtedly irritating, it actually does not require a solution. It can instead be accepted as an incompatibility of scale between the 8 and 24 mile per hex maps. Simply put, the 8 mile per hex map shows things that the 24 mile per hex map is incapable of showing.
Note also that this issue was carried over into other Gazetteer maps, notably Ylaruam. This had a knock-on effect on Rockhome, Soderfjord, and Thyatis — the nations bordering Ylaruam and/or the problem area of Karameikos.
TM1 and TM2 set the whole region in stone, so there is no point in correcting any of this now. For our purposes here with GAZ1, it simply means that the relationship with X1 is complex. Here is a composite overlay using the properly-lined up parts of the two above images:
Let’s use this overlay to examine the newly-developed terrain of GAZ1 in relation to X1.
Terrain: GAZ1 vs. X1
Starting in the west, it may not be immediately obvious, but there are two hexes of clear terrain in X1 directly north of the Achelos Woods (in columns 1 and 2). Expert and other 6 mile per hex maps took these at face value, but GAZ1 changed them to hills. Similarly, the hex including Fort Doom has been detailed with the edge of the neighbouring swamp and more hills.
All of the southern plains — all clear hexes on X1’s map — have been changed to light forest. At the same time, the new heavy forest symbol has been used to represent the Achelos Woods and the Radlebb Woods in the west. Essentially, forest symbols on X1 became heavy forest in GAZ1.
This is not so consistent in the east and the Dymrak Forest, which has been given a less grid-conforming shape. The edges have been split into heavy and light forests, and at least two full hexes (columns 9 and 11) on the northern side of the forest have been changed to another type of terrain. The hex southeast of Kelvin is now solely light forest, while the hex further east is now hills.
GAZ1’s mountains are mostly a direct conversion, with most 24 mile hexes being composed solely of 8 mile mountain hexes. The exceptions are near Threshold. North-northwest of Threshold (column 6), the edge of the mountain has been changed to hills. This is the hex we would expect to find the Lost Valley in. Threshold’s hex (column 7) also has less mountains, and the hex northeast of it (column 8) is almost entirely hills.
Finally, it’s worth noting that there seems to have been a further alignment problem with the eastern mountains. The place I chose for my second overlay in fact does not align with all parts of the eastern border, as evidenced by the extension of the Zargash Mountains.
Settlements and Other Features: GAZ1 vs. Expert
To compare the positioning of other features, let’s refer to the Expert 24 mile per hex map from 1983. It is very similar to X1, but shows more of the settlements, as well as trails.
Once again, I have combined two separate overlays into a hybrid for easy reference. I chose a slightly different placement for this one, lining up using the Zargash Mountains rather than the eastern border.
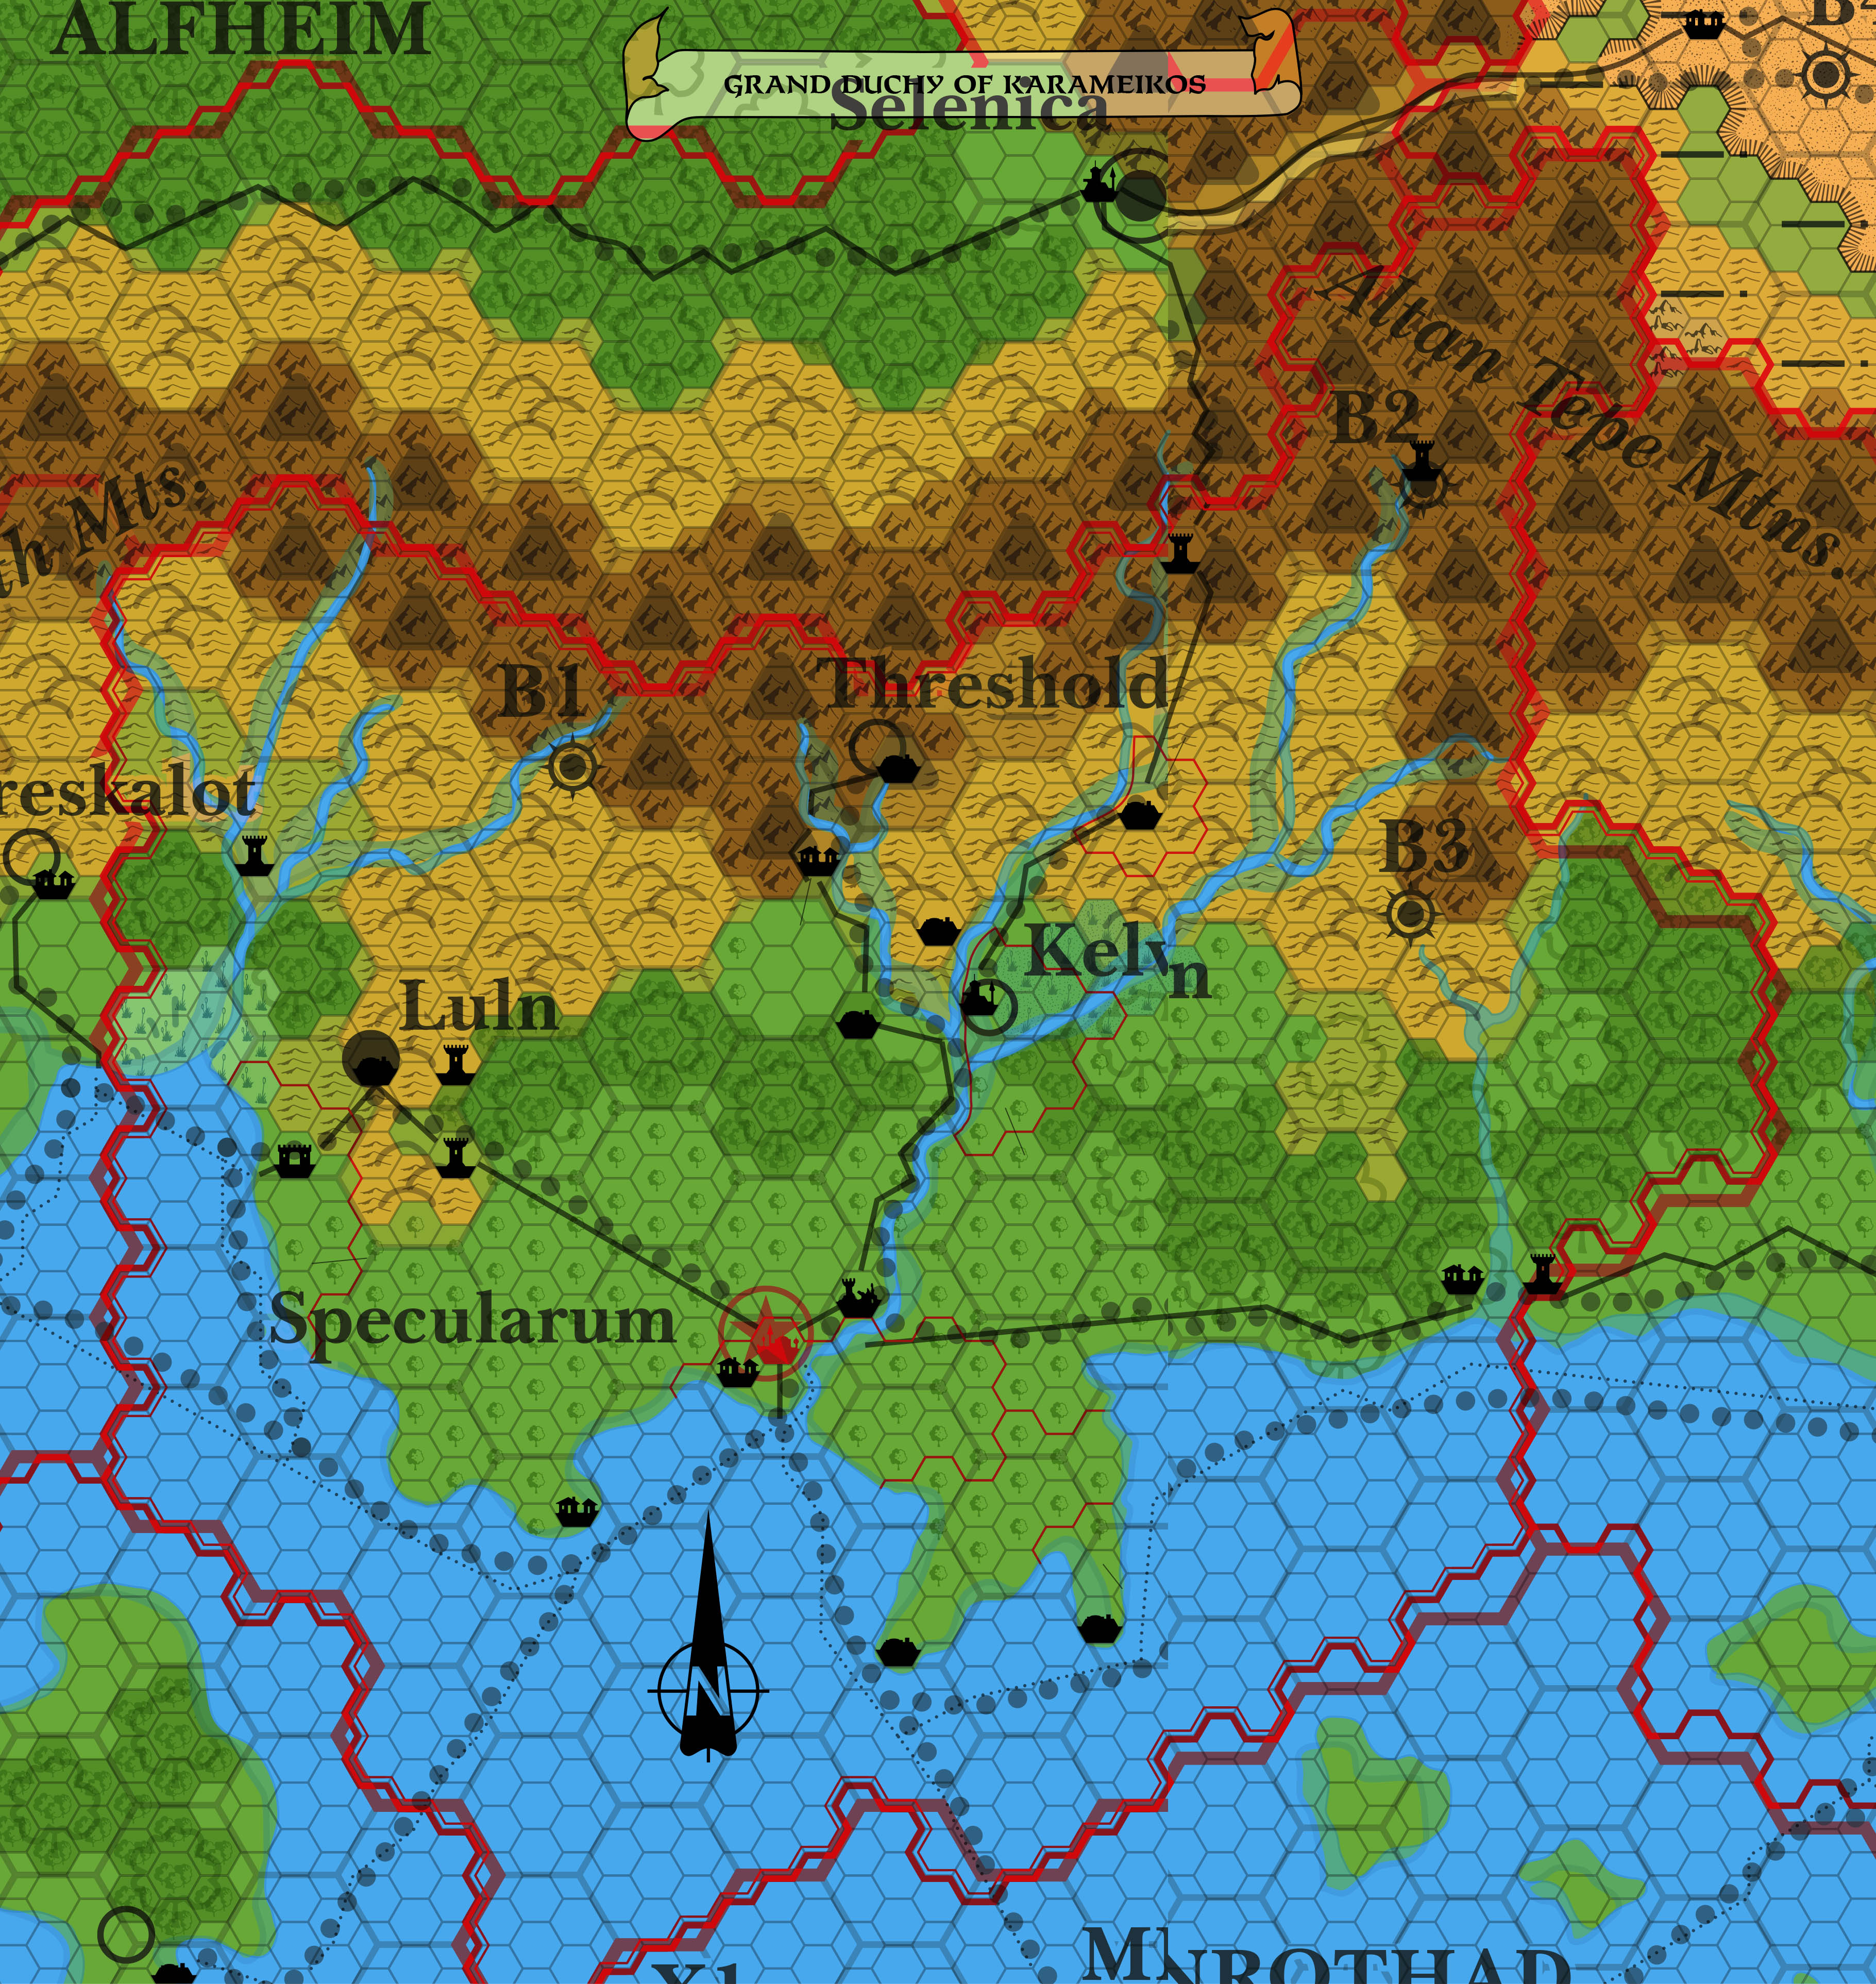
A quick scan of the settlement icons reveals that the locations on the 8 mile per hex map are very close to those on the 24 mile per hex map. Note Luln, Specularum, Kelvin, Threshold, and indeed B2/Castellan Keep, all of which are exactly where you’d expect them to be if working from the 24 mile per hex map. This is the source of one of the main inconsistencies between the 8 and 6 mile per hex maps, because the 6 mile per hex maps were a lot freer with their placement of settlements — as you would expect from a larger scale, closer up map.
The rivers are slightly harder to make out, but it seems clear that GAZ1’s rivers were directly derived from Expert or X1’s rivers, with added details; Robin has pointed out that GAZ1’s rivers appear to be conformed to the 8 mile hex grid. Again, this causes problems when comparing with the larger scale maps, which added their own much finer details to the rivers, often changing their courses significantly from the 24 mile per hex map.
Finally, let’s look at the trails. Aside from the fact that GAZ1 has changed many of these into roads, and conformed the roads to the 8 mile hex grid, it seems obvious that this, too, is a direct derivation.
Lining Up GAZ1 with the 6 mile per hex maps
The conclusion from our examinations so far is simple: GAZ1 did not wilfully ignore the larger scale maps. Rather, it went back to the origin point, the 24 mile per hex maps, assuming them to be the best source. But neither did it ignore the 6 mile per hex maps entirely. It’s now time to delve into this relationship, and see what we can find.
GAZ1 vs. Mystara 1985
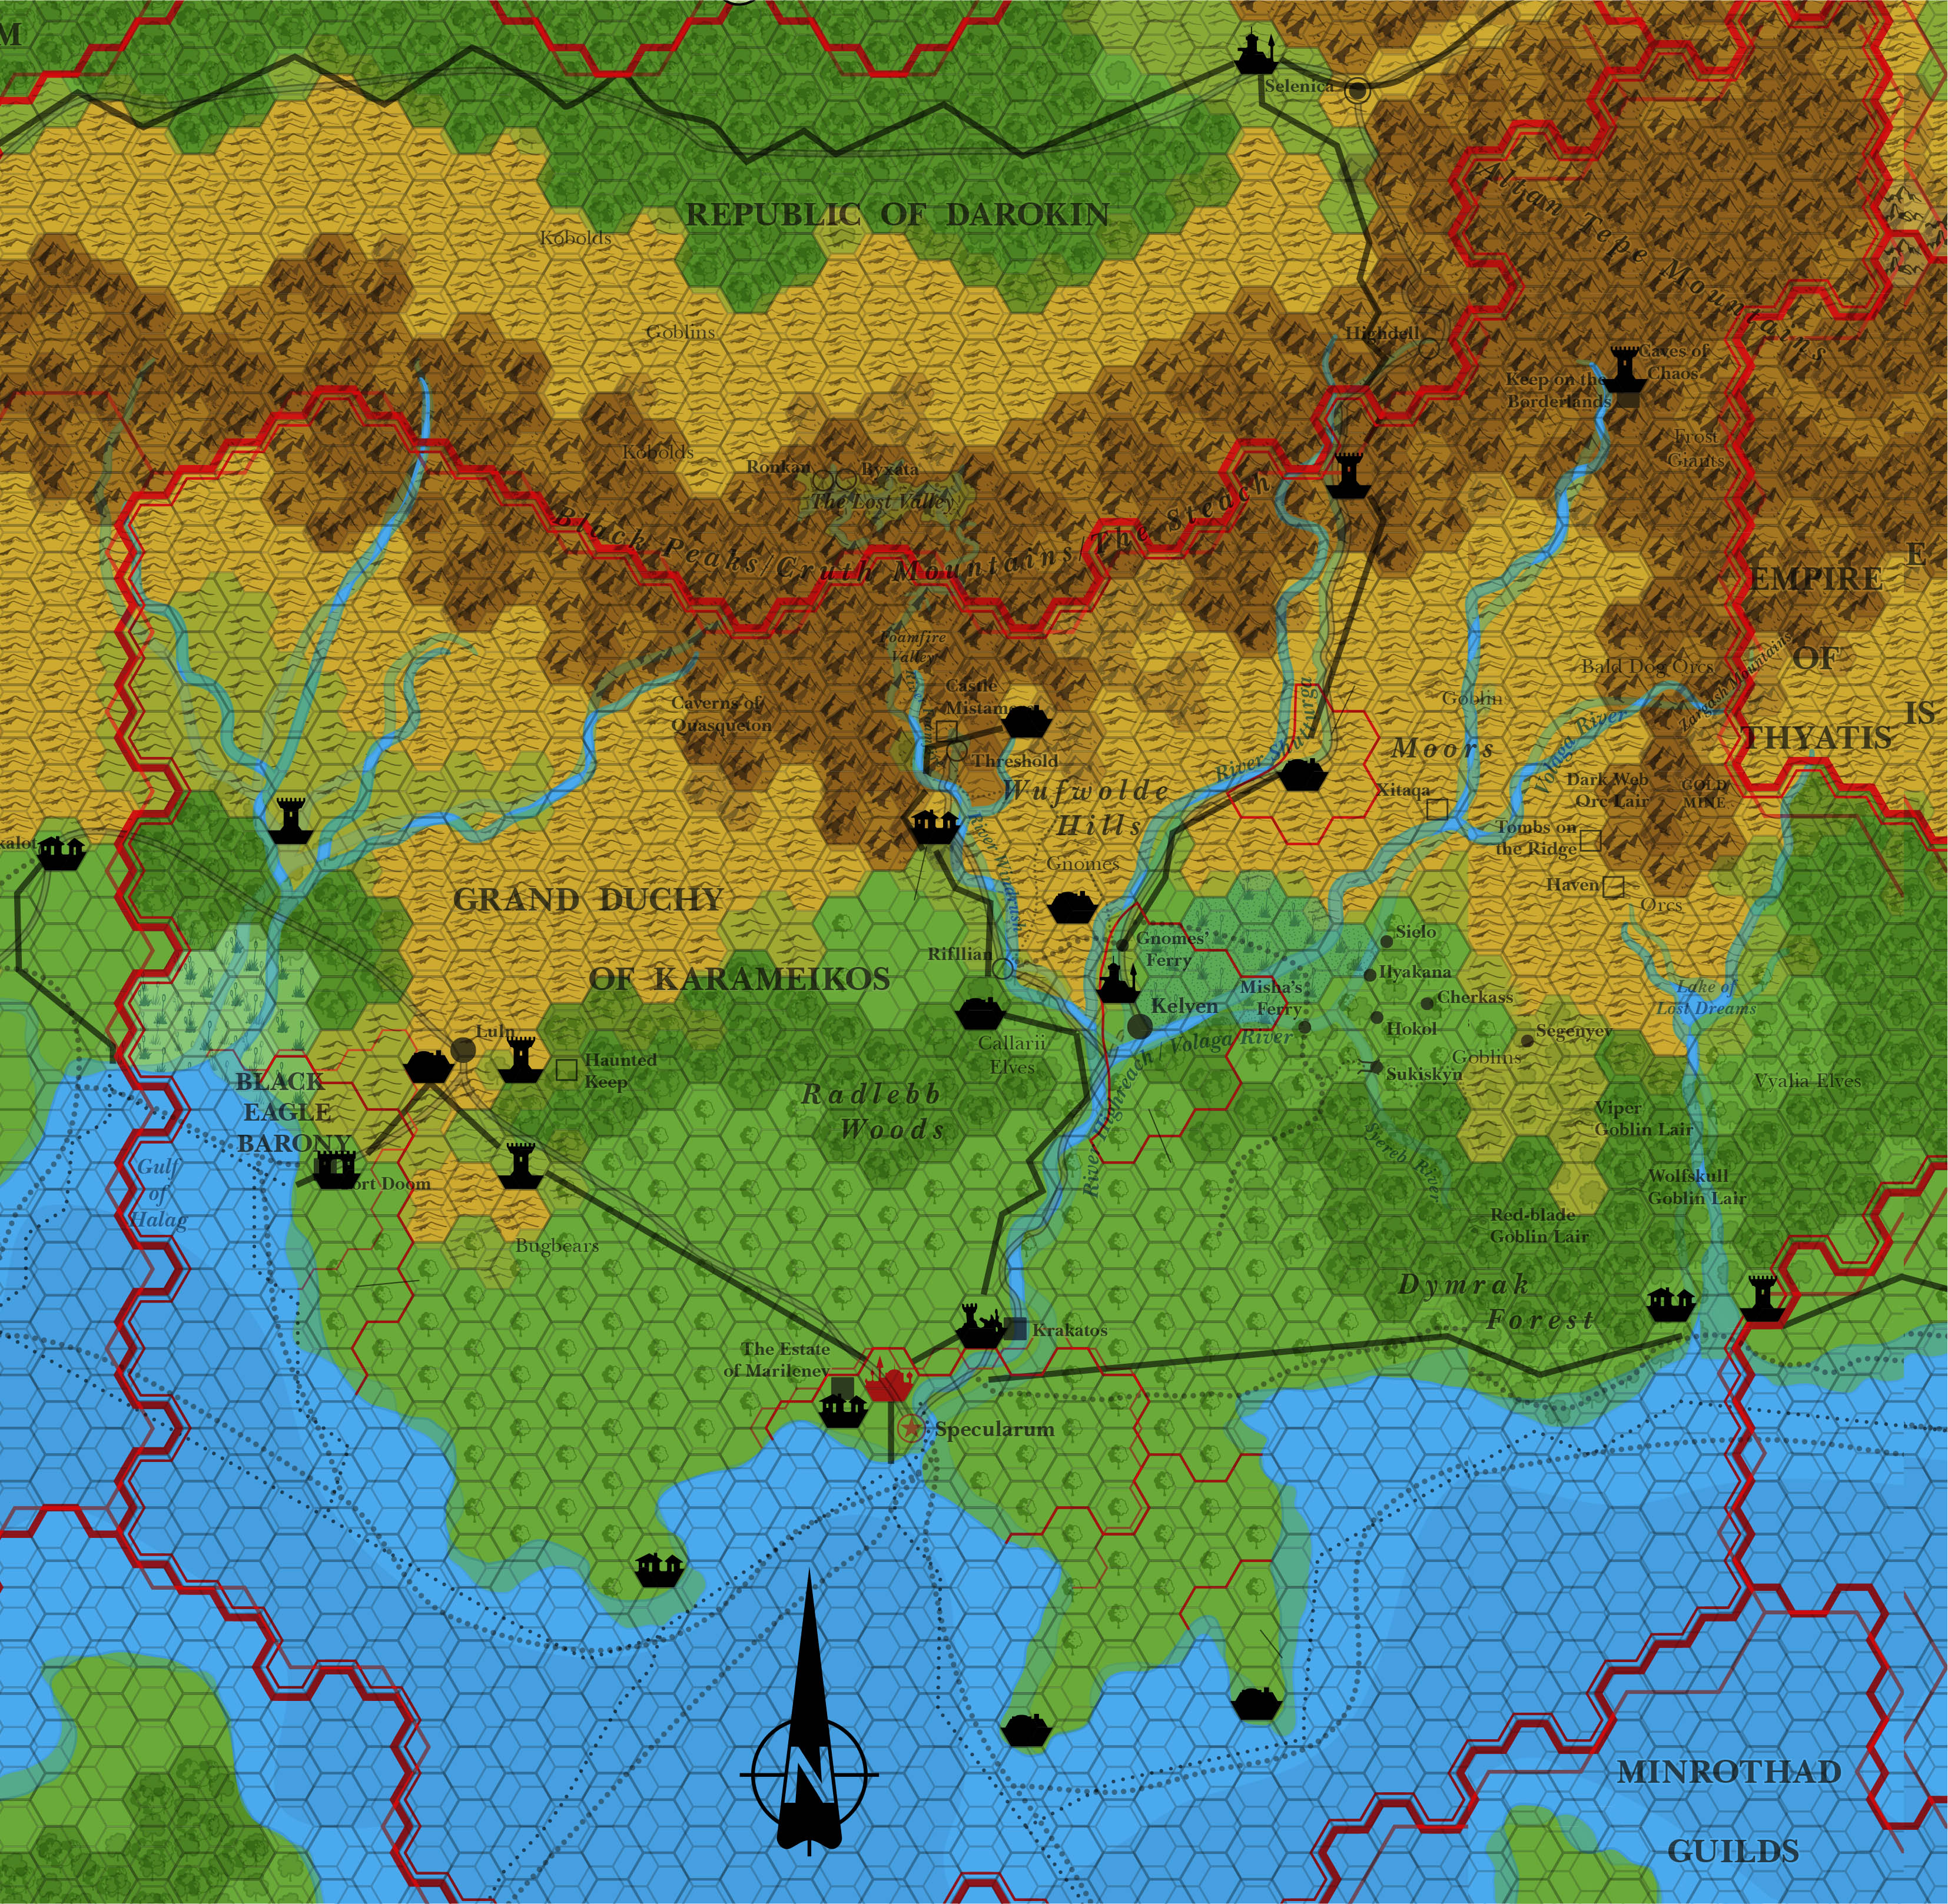
For simplicity’s sake, I am going to use my Karameikos, 6 miles per hex (1985) map for this comparison. I avoided using chronological maps for the 24 mile per hex comparison for the simple reason that those maps have been made consistent with the larger scale maps. In other words, on those 24 mile per hex maps the settlements have been shifted to match their locations on the 6 mile per hex maps. This is not the case with the latter, as they are the most detailed source available. Thus, the Mystara 1985 map is simply a synthesis of both Expert Set maps with the X10 map.
Here is the overlay:

As expected, the fit isn’t great, and we probably need a separate overlay for the east of the country. For now, this is good enough to be going on with.
Once again, let’s start off by looking at the terrain. As noted above, the clear terrain north of Achelos Woods on the 24 mile per hex map was also marked as clear terrain on the 6 mile per hex map. GAZ1 placed hills here. However, look closely and you can also see that the forest itself overlaps with the hills in a way that could be shown on the 8 mile per hex map.
There are quite a few other places where one map has hills, the other forests. The most notable of these is the eastern Dymrak Forest, where GAZ1 changed a significant section of the forest to hills.
The forests themselves are harder to judge, because of course the 6 mile per hex map did not have the light/heavy forest distinction. GAZ1’s new extensive areas of light forests, and its splitting of the previous “forest” symbol into a mix of both types, seems like a new creative decision.
The area of moors east of Kelvin is an interesting addition, if only because it likely stems from B10’s description of “moors”. The moors in B10 were never marked on any of its maps, however, so this is another new addition.
Finally, let’s look at the mountains. As noted above, GAZ1’s mountains are, at almost all points, a straight conversion of the 24 mile hexes into lumps of 8 mile hexes. The 6 mile map, on the other hand, had a lot of fine detail adding valleys and spurs to give shape to the mountain range. This is especially clear with GAZ1’s blobs for the Zargash Mountains in the east. The 6 mile per hex version was nuanced, whereas GAZ1’s is… well, a blob. A clearly 24 mile hex-derived blob.
One other point about the mountains is that it looks as if the overlay in the east could be brought into line by shifting the 6 mile per hex map one hex to the southeast. So perhaps we should indeed do what we did with the 24 mile per hex overlays, and create a hybrid.

This leaves the rivers, roads, trails, and settlements, for which let’s use the hybrid overlay. GAZ1’s rivers, roads and trails are derived from the 24 mile per hex map, and are therefore less detailed than the 6 mile per hex map’s versions. However, there are a few interesting differences.
The Luln-Wereskalot road is entirely missing. This road comes from X10’s 24 mile per hex map, so it’s not surprising that it was overlooked. Otherwise, the roads largely match up. GAZ1’s were made very angular, and in places fitted to the hex grid. These are not major differences.
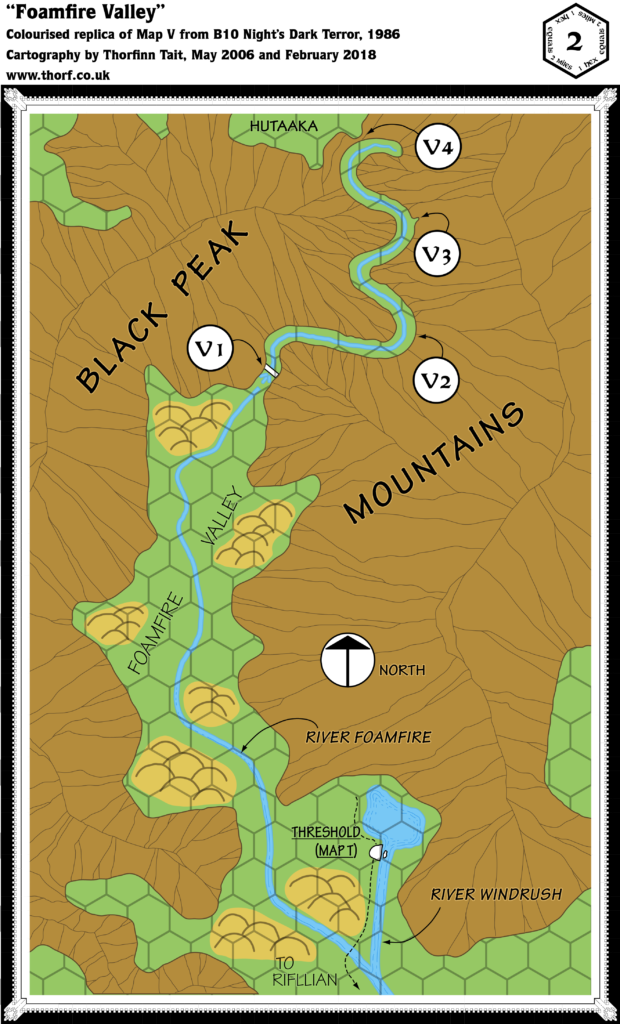
GAZ1’s rivers, as noted above, derive from the 24 mile per hex map, with slight details added. They were also conformed (loosely) to the 8 mile hex grid. The 6 mile per hex map’s rivers are rather more nuanced. The major difference in rivers comes with the Foamfire and the Windrush, which are rather different. The reason for this is tied to the location of Threshold, and GAZ1’s newly added village of Verge.
This brings us to the biggest sticking point, the settlements. Wereskalot, Fort Doom, and Marilenev Village are all spot on. So is Castellan Keep if we consider the shifting overlay problem in the east. Others are a hex or so out: Luln, Koriszegy Keep, Specularum, Krakatos, Kelvin, Highforge — and Threshold. This last one is the biggest shift. As we saw earlier, the reason for this was not a deliberate shift, but rather a simple direct port of its 24 mile hex grid location. Still, the addition of Verge makes this an interesting problem.
There are various other additions, of course. Those are not problems and can be taken at face value with their 8 mile per hex locations.
GAZ1 vs. Mystara 1986
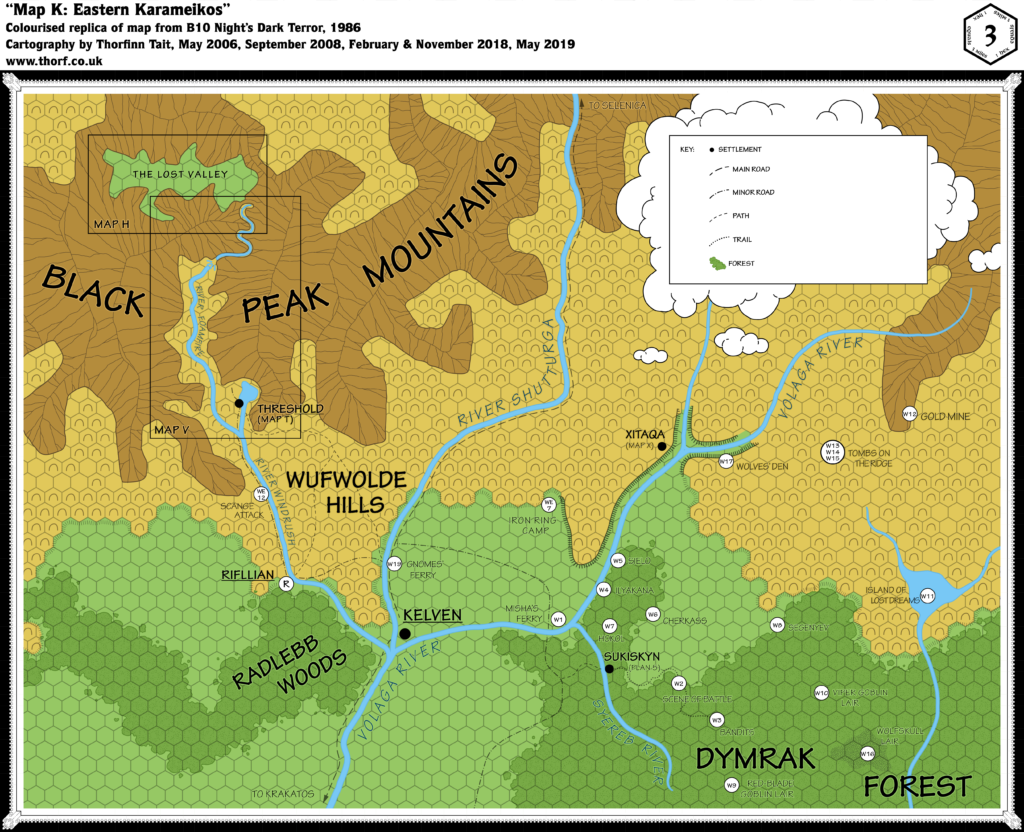
We’ve now done a reasonably complete comparison of all the pre-B10 sources with GAZ1’s map. Now it’s time to bring in B10’s changes, and see how they compare. B10’s maps are Eastern Karameikos, 3 miles per hex, Foamfire River, 2 miles per hex, and Lost Valley of Hutaaka, 2 miles per hex. They have their own problems of internal consistency, which I solved to my satisfaction in Mystara 1986. Since I incorporated many of their details into my 6 mile per hex map for 1986, let’s start by doing a comparison with that map. It should be quite easy to see any differences from the 1985 comparison we just completed. We’ll go straight to a hybrid overlay this time.
Going straight to the major differences, the Foamfire River goes much further north, extending to the Lost Valley, and of course there is a lot of new detail east of Kelvin and in the Dymrak Forest. The rivers in that area were also rather different, with the main Volaga River flowing south to be parallel with Kelvin before turning and flowing due west to meet the other rivers at the city.
The terrain seems to be largely the same, with a few new details added by B10 mainly in the Dymrak Forest area. But these are few compared to the differences already present from the previous 6 mile per hex maps.
Since we’ve already reconciled B10’s additions with the 6 mile per hex Karameikos, the main task with GAZ1’s map seems to be reconciling it with the 6 mile per hex maps. Since there are 3 and 2 mile per hex detail maps, it would be preferable to give priority to these where possible.
Summing Up the Problems
GAZ1 introduced a wealth of new details to Karameikos. However, it did so without including many things added in previous years. The conflict between these new and old details is the main problem. Instrumental in sorting through this will be judging whether a feature of GAZ1’s map is an intended new detail, or simply a straight conversion of the original smaller scale maps upon which it is based.
The most glaring issues are:
- Mountains — Whether to incorporate the detailed shapes of Expert and B10’s mountain ridges, or keep the X1-based block of GAZ1’s map.
- Rivers — Whether to go with GAZ1’s slightly adjusted but still X1-based rivers, or adopt those from Expert and B10.
- Settlements — Whether to leave GAZ1’s settlements in their 24 mile per hex-based locations, or adjust them to the positions of the larger scale Expert and B10 maps. Threshold in particular is a sticking point here, but Kelvin, Luln and Specularum also need careful consideration.
Community Discussions
Although the problems with Karameikos have been common knowledge for years, there hasn’t been a great deal of discussion of the misalignment problems with the 24 mile per hex map. Most discussions have instead focused on compatibility problems with B10 and the earlier 6 mile per hex maps.
In February 2025, I posted about these issues on my Patreon page as well as at The Piazza.
Under Construction! Please check back again soon for updates.
The Solution
To decide on a way forward among such a complex set of maps, it may be helpful to recall the principles of the Atlas, as well as my Let’s Map Mystara project. Two of the primary principles are the idea that larger scale maps override smaller scale maps, and that newer maps generally supersede older maps. The former is only natural, as larger scale maps usually provide far finer detail. Meanwhile, the latter idea is simply the acceptance of “progress”, without which there would never be a way forward at all.
In terms of GAZ1’s map, the clearest revelation in the above analysis is the idea that GAZ1 was based almost exclusively on 24 mile per hex maps. This means that GAZ1’s designers did not wilfully or deliberately ignore larger scale maps, and therefore the choices they made were not meant to override those maps, nor indeed to contradict them.
My conclusion from all of the above is that we should absolutely use the 6, 3, and 2 mile per hex maps from Mystara 1986 (derived of course from X1, Expert, X10, and B10) to revise and add detail to 1987’s 8 mile per hex map.
The caveat is that, since GAZ1 is the new map here, we should also take care to preserve any new details that it added.
So, with those principles, let’s get to it.
The following elements should be taken from the 6/3/2 mile per hex maps, adjusting the 8 mile per hex map to match:
- Coastlines — The larger scale map’s coastlines are in general more detailed. They are also not wildly different, so this is not a major change. As for the islands to the south, their own best sources are just around the corner. Safari Island is already present in GAZ4 in Mystara 1987. The others will come in 1988 and 1989, and are likely to be close to GAZ1’s versions, so for now those can be used.
- Rivers — The 8 mile per hex map’s rivers were closely based on the 24 mile per hex map’s, but also added a little detail, even if it can be viewed as conforming to the hex grid in places. A close comparison may reveal places where details should be kept, but in general the 6 mile per hex map’s rivers should be used. Most problematic is the Rugalov River, which originates in B10, but without a join to the coast. GAZ1 is the primary source for how the river meets the coast, and it also extends the river’s eastern source well past the Lake of Lost Dreams. A compromise may be the best solution here, keeping the mouth location from GAZ1, the river and lake locations from B10, then adding the extended river to B10’s base.
- Settlements — Aside from settlements new in GAZ1, the precise locations of settlements can be taken from the 6/3/2 mile per hex maps.
- Terrain — With the major exception of terrain newly introduced in GAZ1, the larger scale maps’ terrain should be compared and the 8 mile per hex map adjusted as appropriate. Note that exact matching here is impossible due to the nature of hex maps, and is therefore not required. A general match is, however, desirable of course.
As for other features:
- Depths — Sea depths can be brought in from GAZ4 for the southwest, and X7 for the southeast coast, matching the coastlines.
Under Construction! Please check back again soon for updates.
The Revised Maps
Below are the revised maps for Mystara 1987 as they appear in the Atlas of Mystara.
Under Construction! Please check back again soon for updates.
3 February 2025 @ 5:52 am
This is great Thorf! Excellent reverse engineering of the likely designer’s process. Of course this brings up a lot of questions of reconciliation.
The Master-to-HW world map problem is similar, in that both involved an accidental continuity breakage due to cartographic slips. And in both instances, the ‘mistake’ then served as the basis for further worldbuilding.
Seems to me, if the AoM were to apply the same principle to this problem, the AoM would correct the slippage by essentially keeping the B10/Expert maps as the basis, and actually redrawing the GAZ1 map to ‘fix’ its mistakes. I withdraw my earlier suggestion of drafting a midline between the two depictions of courses of the rivers, trails/roads, and shorelines. Because, as you say, the GAZ1 shapes suck in that regard, since they are simply angularizations or hex-conformed shapes.
However, there are some features of the GAZ1 map which could enhance the updated map. I would distinguish between:
–Linear features: rivers, trails/roads, shorelines. It sounds like we’re both leaning toward keeping the pre-GAZ1 shapes, and tossing the GAZ1 shapes. Though the Duke apparently upgraded some trails to roads, so that’d be one acceptable change.
–Placement of settlements and other sites. For similar reasons, it sounds like you’re leaning toward keeping the pre-GAZ1 placement of sites, including Threshold! This is an exciting breakthrough! I appreciate how the decision was based on an objective analysis and reverse engineering. Will be interesting to see how Verge and the 2E Eltan Spring area connect with the original/correct placement of Threshold.
–Terrain types. I suggest that this is one category where the GAZ1 map could be used as equal datapoint, along with the other maps. And also, where a sort of AoM “algorithm” could be applied. Basically, I suggest that, with regard to terrain types, all of the official maps be counted as an (equally weighted?) datapoint. And that the ratio of terrain within each hex (at each relevant scale) reflect all of those datapoints in a ratio’ed way. To give one example: the two Achelos clear hexes, at the 4-mile hex scle, would be exactly half hill hexes and half clear hexes.
Also, the shapes of the terrain areas (e.g. the extended hill line in those Achelos hexes) should probably model the trend of the nearest relevant features (e.g. the trend of the foothills to the north), or similar examples from other Mystaran hex maps, rather than just making a random checkerboard.
This ratio-technique could be applied methodically throughout the map. E.g. the mixed mountain/hill hexes in the Wufwolde, and in the inset valleys of the B10/Expert Cruth Mountains–the valleys would be there, but they would be composed of half mountain/half-hill hexes at the 4-mile hex scale. So yeah, this would mean keeping the blocky GAZ1 mountains–but only at the 8-mi. per hex scale.
Same for the various forest densities in the eastern woodlands.
I guess one complication of the ratio, would be calculating the relative weight-ratio of hexes. I guess they should all be equally weighted(?), but of course, if a smaller hex terrain (e.g a 3-mile hex) only overlaps a part of a larger hex’s terrain (e.g. an 8-mile hex), the ratio-of-effect of the 3-mile hex’s terrain would only extend into the area covered by its hex.
It will be neat to see a ‘corrected’ GAZ1 map.
Also, this is not a priority, but the GAZ1 style of hex-conformed blocky mapping (wonky though it is) could be explicitly distilled into a type of alternative map format, which could be applied to any hex map! This format could even take it even further than GAZ1 (and thus illustrate the principle more clearly), by making the trails and roads exactly straight within one hex, and by making the rivers exactly follow the edges of hexes…and maybe even hex-shaped shorelines! Like I said, just a thought experiment, not a priority.
I’m not familiar with the Trail Map problem. It sounds like AoM has preemptively decided that the Trail Maps are sacrosanct, and can’t be modified, but only added to. But if, instead, they were really just another map to update, then the accidentally shifted column could be fixed even on the Trail Map! However, I admit I don’t know the details well enough in this regard. Just trying to clarify the options.
3 February 2025 @ 8:57 pm
Thanks for making such a detailed reply. I appreciate it!
There are various principles here guiding my projects that come into play here. I talked about some of them, but it’s worth noting another two here. First, I am eager to preserve the internal integrity of as many maps as I can. What this means is that while I’m happy to fix mistakes, I’d rather avoid throwing out or invalidating whole swathes of territory. Thus, I have used such techniques as reinterpreting the scale and applying rotations to fit maps in without affecting the actual maps themselves. This of course applies to the Gazetteer maps, too, and I’d really rather avoid announcing that they were wrong and that I’m making a “better” version. At this stage, it doesn’t seem useful — especially since it would throw my maps out of sync with all other maps that have been created in the intervening decades.
Tweaking settlements, rivers, etc. within a hex or so is fairly minor. On the other hand, to fix the overlay problem I outlined above would mean adding a whole column of hexes back in, and revising all the neighbouring maps accordingly. Conversely, if I don’t fix this, I’ll need to remove a column (?) from the 6 mile per hex maps, I believe. If I have to choose between these two things, I’ll go with adjusting the 6 mile per hex map, because from Mystara 1987 it’s clear that the 8 mile per hex scale was the new main scale. Also, I can do this without losing the details of the 6 mile per hex map, so it seems the best solution.
The other principle is documenting my sources. Every feature in all of the maps in this project has a source tag showing where it originated. This was actually my initial motivation to start the project, as I wanted to know where I took a certain feature from without having to go back and research it all again. In these maps, that is as simple as clicking on a feature and looking up a table.
This doesn’t mean that I can’t adapt a little, but in most cases I prefer to make a choice rather than averaging. And the choice is usually based on factors such as scale (which map was larger scale), level of detail (which version has more detail), and so on.
Where I can be a little creative is in merging the terrains together. I tend to allow anything to override clear terrain, thinking of it as pretty much a blank slate. On the other hand, if there are hills on one map and forests on the other, that seems like a wonderful opportunity to add forested hills. You will definitely see some of these on the Karameikos 1987 map when it’s finished.
3 February 2025 @ 6:13 am
P.S. Maybe the shorelines could use the ‘midline’ principle of rubbersheeting between the various official depictions. Not sure.
Also the shipping lanes, because, like who cares? 🙂
4 February 2025 @ 11:46 am
Well then if you’re not averaging the terrain, then yeah, I’d nix the blocky mountains, and like with other features, ‘fix’ the GAZ1 map, by re-rendering (and thus paring back) the shape of the mountains based on the larger-scale maps.
I don’t know though, I think we’re losing some data by not averaging, since, for example, the two plain hexes north of Achelos Woods were on a map that had hill hexes elsewhere on the same map. So it seems that the map was indicating that the terrain was somehow different than hills, which could be preserved by making half of the hexes clear and half hills.
But I understand that could be a lot of work, to average the terrains. Anyway, I respect what direction AoM goes, even if I have some different preferences.